Did your Google Chrome browser has become slow and unresponsive? Does it lag a lot during your normal day-to-day web browsing? You are not alone. Here in this article we have outlined the top 10 ways to make Google Chrome fast again.
If you are using Google Chrome as your primary web browser then you must be aware about the fact that the Chrome web browser is faster, performs better, and is less resource hungry as compared to any other web browser.
But still, at times, it does becomes slow and the overall performance degrades over time. And in this case, Google Chrome is not alone. Any web browser that performs best in the beginning will become sluggish after extended usage.
Additionally, there could be a number of possible reasons causing you to experience slow browsing on the Google Chrome browser. For instance, the extensions installed on your browser, the plugins you are using, Chrome Web Apps that are installed on your browser, your computer’s overall capability, your Internet connection speed. All of these contribute towards the speed of your browser.
Nonetheless, the intensive guide we have prepared will assist you in regaining the lost speed and nowhere-to-be-found performance of your Google Chrome browser in no time.
How to Make Google Chrome Fast Again
There are a numerous tips and techniques to make your slow Google Chrome web browser fast and speedy again. But below in this article, we have discussed ten working tips that, if followed correctly, will surely make your web browsing experience swift and quick on Google Chrome web browser, just as it was after the first fresh installation.
We will recommend that you follow each of the below tips and techniques one by one till the end and then try to use Google Chrome web browser again to check whether the slow Google Chrome usage issue has been fixed or not.
- Tip #01 – Erase Cache, History, and Other Browsing Data
- Tip #02 – Enable Pre-rendering and Preloading Website Resources Feature
- Tip #03 – Remove Unwanted and Infrequently Used Web Apps
- Tip #04 – Disable Rarely Used Plugins
- Tip #05 – Deactivate or Remove Unnecessary Extensions
- Tip #06 – Disable Hardware Acceleration Feature
- Tip #07 – Learn To Use Google Chrome Task Manager
- Tip #08 – Enabling Google Chrome Flags
- Tip #09 – Keep Your Browser Up To Date
- Tip #10 – Scan Your Chrome Browser Using Google Chrome Cleanup Tool
NOTE: This guide and all the steps mentioned in this guide are prepared on Microsoft Windows 7 operating system. But same procedures apply to other versions of Windows including Windows 8, Windows 8.1, and Windows 10, and other operating systems including Mac, Linux, and Chrome OS, provided that the same features are available on your version of Google Chrome web browser.
IMPORTANT: At the time of preparing this content, my computer was running Google Chrome version 47.0.2526.73 m (64-bit).
Tip #01 – Erase Cache, History, and Other Browsing Data
If you are using Google Chrome web browser since a long period of time then there is a high probability that your browser must have collected and stored a huge amount of cache, temporary Internet file, data of various websites, history and other browsing data.
For those of you who are not aware, these data and information are stored and maintained by the Google Chrome web browser because it reduces the overall time required to load any particular website when you are revisiting it.
But there are times when you visit a website once and then never revisit it. Data of these websites stays on the hard driver, which then becomes cluttered just after several weeks of (intense) web browsing.
So below we have outlined some easy to follow steps that will help you in erasing cache, history, and other data stored by the Chrome web browser on your computer and make Google Chrome fast again.
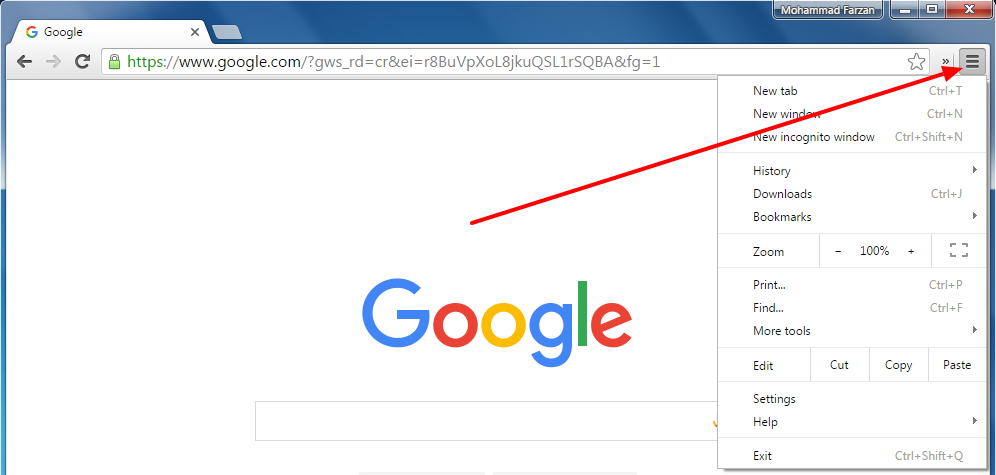
Step #01 – Click on the Google Chrome Menu icon (located in the tool bar at the upper-right corner of the Google Chrome web browser) to open the Chrome drop down menu.
Step #02 – Select the “More tools” option, and then click on the “Clear browsing data” option.
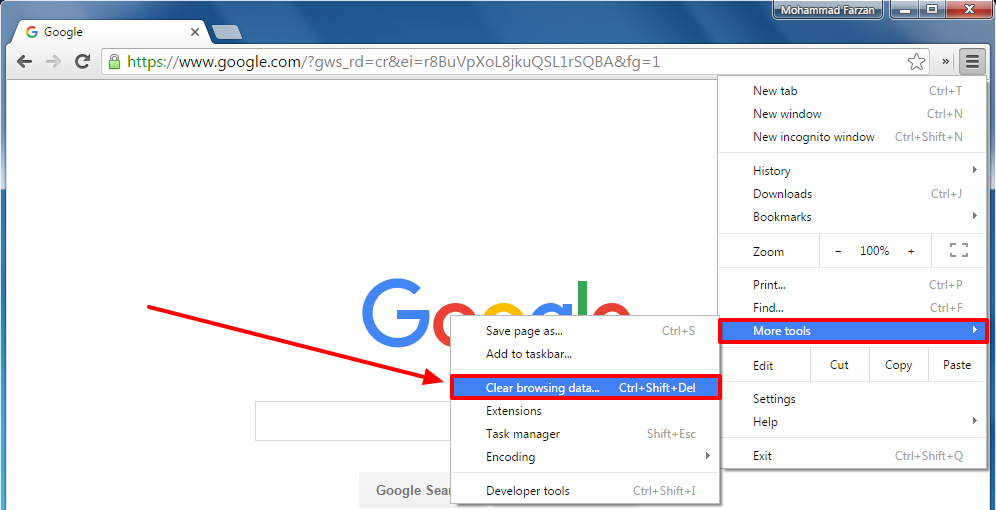
Alternatively, you can open Clear browsing data window using a predefined shortcut key combinations, “Ctrl” + “Shift” + “Delete”.
Step #03 – Once Clear browsing data dialogue box has been opened; you will see a drop down menu list that is followed by a number of check boxes.
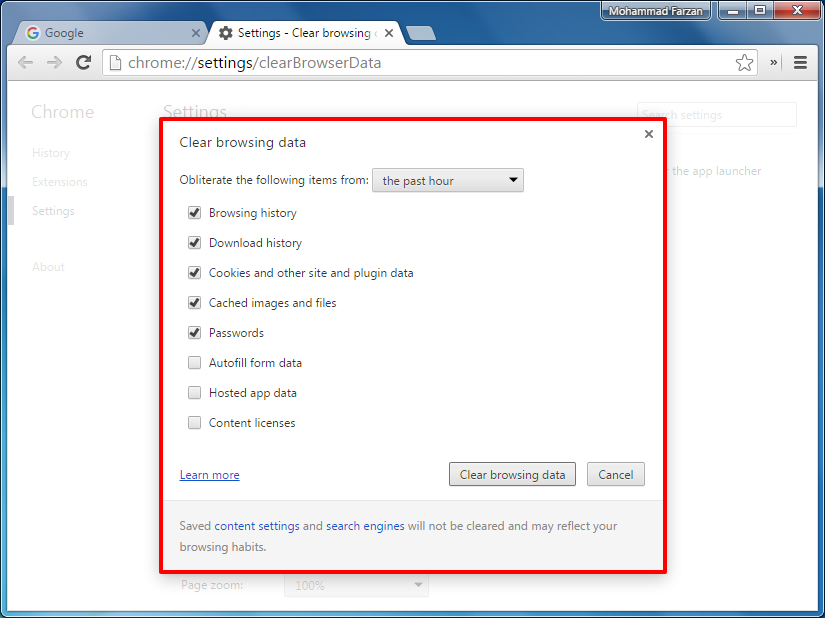
Step #04 – You can use drop down menu list to select the amount of browser data you want to erase from your Chrome web browser.
The possible options include the past hour, the past day, the past week, the last four weeks, and the beginning of time.
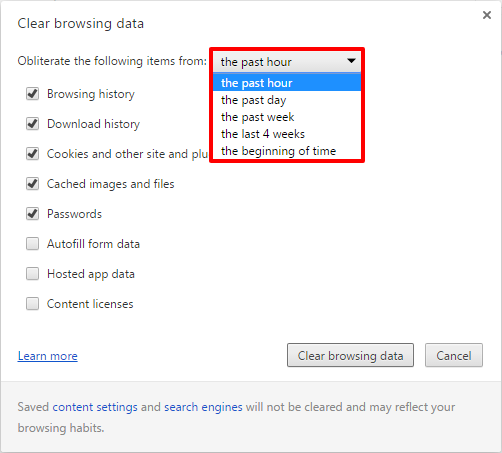
Make your selection depending on the amount of data you want to erase from the browser.
Step #05 – Next, you have to select the check boxes for the type of information and data you want to remove from the Chrome browser.
The options that should be available to you includes browsing history, download history, cookies and other site and plugin data, cached images and files, passwords, autofill form data, hosted app data, content licenses.
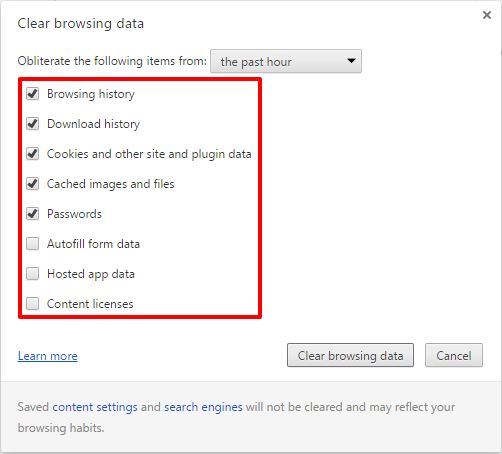
IMPORTANT: Clearing your web browser data like autofill form data and stored passwords will not make your Google Chrome faster. Make your choices wisely!
We will suggest you to take your time in selecting the right check boxes because once the data has been cleared from the web browser there is no way to recover it.
Step #06 – Once both of your selections has been finalized; you can then click on the “Clear browsing data” button to remove selected browser data.
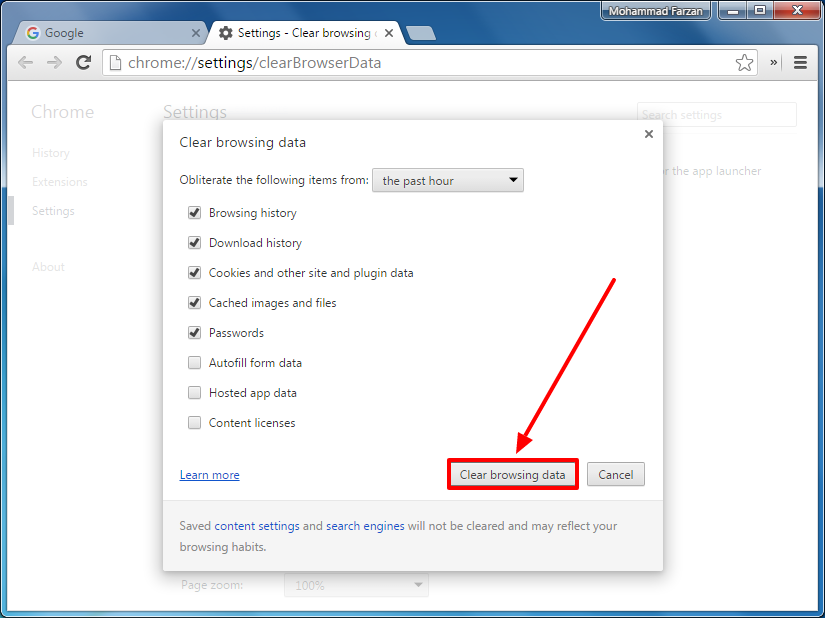
Congratulations! Your selected data and information for the specified period of time has been successfully cleared now.
Tip #02 – Enable Pre-rendering and Preloading Website Resources Feature
Enabling prefetch resources feature on your Google Chrome will permit your browser to preload the resources of the website or the web page you are about to visit. This ultramodern and innovative prediction feature learns your web browsing habits and allows the Chrome browser to load web pages quickly.
Google Chrome is able to achieve faster page loading by predicting what link you might click next on the web page you are currently browsing, and then preloads that specific page so that it can be instantaneously loaded for you, hence it will make Google Chrome fast. ?
In case you are not aware about how prefetch resources feature works, enabling this feature can be beneficial for you in two ways:
- When you are browsing any specific web page, it is possible that once you are finished reading that page you might click on the “next article” button to read another piece of content on the same website.
If this is the case, then the web page will automatically instruct the Chrome browser to prefetch the content located in the “next article” link so that the specific loads instantly when you click on it. - When you are typing a website address in the address bar, Chrome will automatically initiate the prefetching process of that specific page for you. This process is only started by the Chrome web browser when it is confident that you are expected to visit that web site.
Furthermore, the amazing aspect of this feature is that the dependency of this entire prefetching process is based on your local history stored within your computer.
Enabling prefetch resources feature on your Google Chrome web browser will significantly affect your overall web browsing experience and make Google Chrome fast. So if you want to enable it then follow the guide given below.
IMPORTANT: If you have a slow Internet connection then we will recommend you to keep this feature disabled.
Step #01 – Click on the Google Chrome Menu icon (located in the tool bar at the upper right corner of the web browser) to open the Chrome drop down menu.
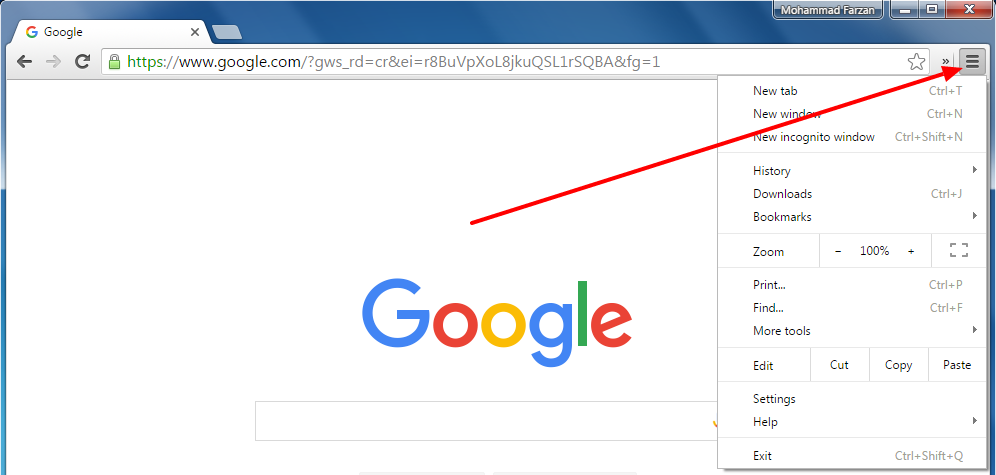
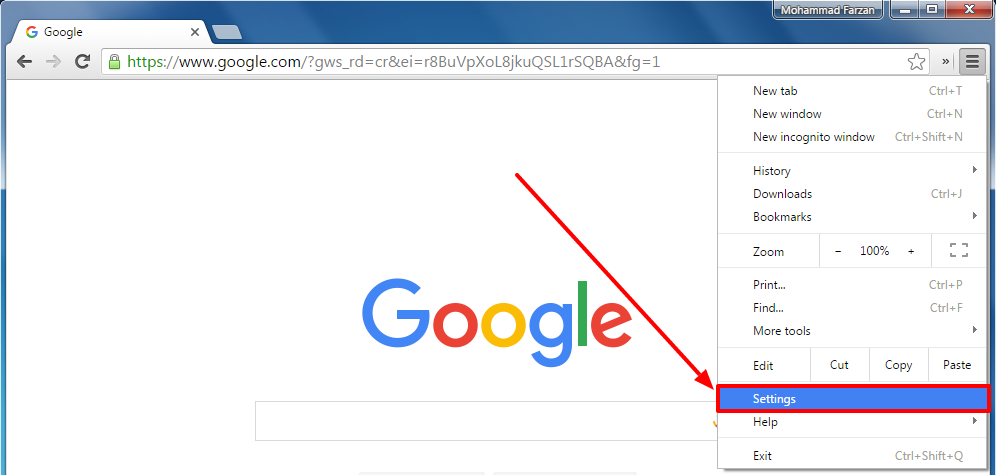
Step #02 – Click on the “Settings” option.
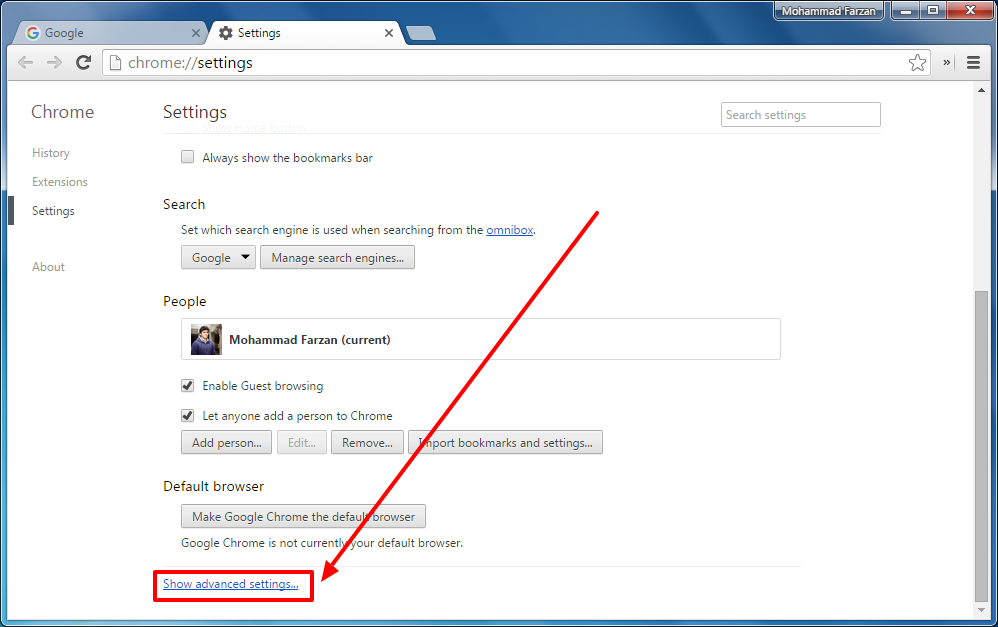
Step #03 – Scroll to the bottom of the Settings page where you will find a text that reads, “Show advanced settings…”, click on this text to reveal advanced settings and configurations.
Step #04 – Now scroll down a little bit until you find a section named, “Privacy”.
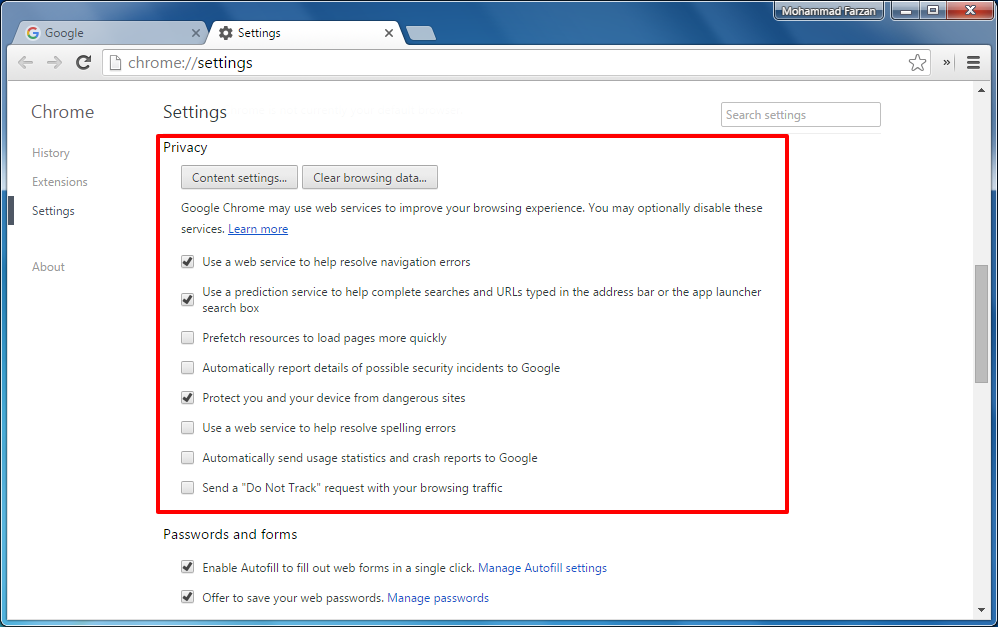
Step #05 – Under the “Privacy” section, there will be a check box that says, “Prefetch resources to load pages more quickly”, click on it to enable this feature.
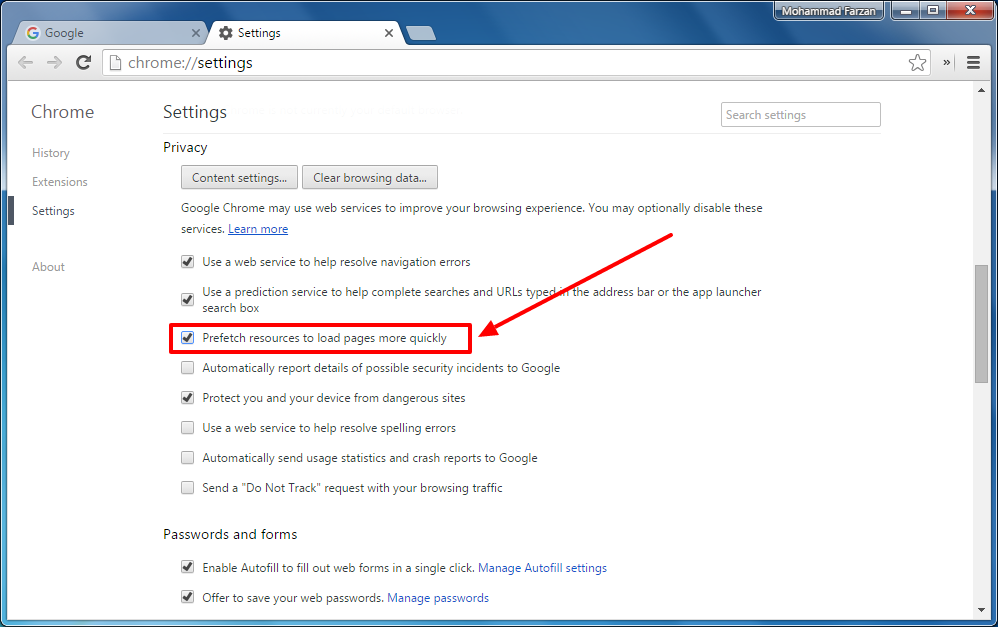
That’s it. Now Google Chrome will prefetch resources and improve the overall page loading time.
Tip #03 – Remove Unwanted and Infrequently Used Web Apps
If there are apps installed in your Google Chrome web browser then we will suggest you to check and see if they are only used once in a blue moon. If there are any then it will be better to remove them because, whether you are using them or not, they are going to consume the available resources and will negatively affect your web browsing experience.
For those who don’t know, Google Chrome Web Apps are actually a type of extensions that are either packaged or hosted and are written using languages like CSS, JavaScript, and HTML5. Unlike extensions, Chrome Apps are capable to run offline and are very much similar to a desktop software or app.
The procedure to remove unwanted and infrequently used web apps from your web browser and make Google Chrome fast is as follows.
Step #01 – To open the Google Chrome Web Apps page, in the address bar located at the top, type the URL chrome://apps and press the enter key on the keyboard.

Alternatively, you can access the Google Chrome Web Apps page by clicking on the “Apps” button located at the beginning of the Bookmarks bar.

Step #02 – On this page you will see all the apps that are already installed on your Chrome web browser.
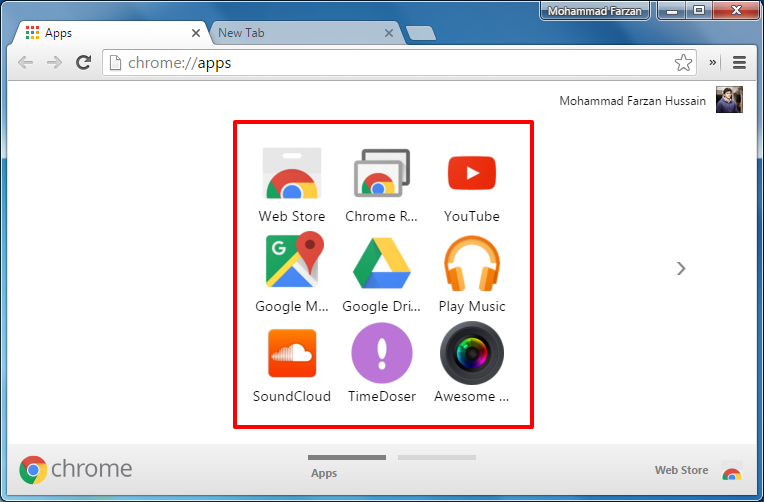
Step #03 – To remove any app from your Chrome browser, right-click on that app’s icon. Here I am going to remove Chrome Remote Desktop app from my Chrome browser.
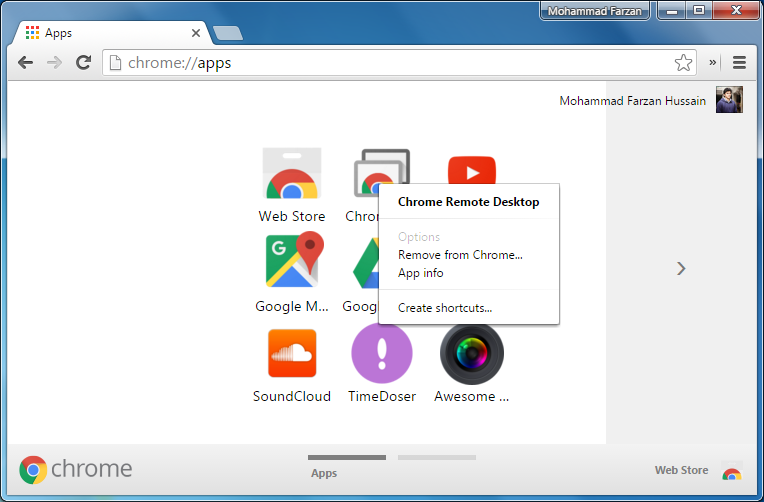
Step #04 – Select the “Remove from Chrome…” option.
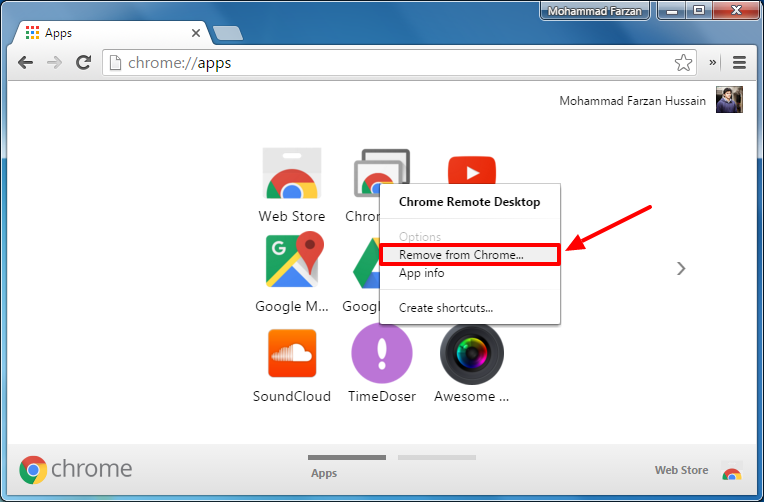
Step #05 – A pop-up notification will appear, prompting you to confirm if you want to remove the app. Click on the “Remove” button to remove the app from the Google Chrome web browser.
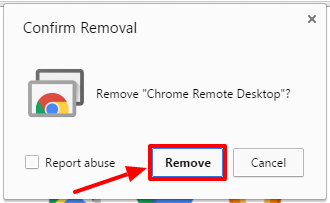
That’s it. Your selected app has been successfully removed from the Google Chrome web browser.
Tip #04 – Disable Rarely Used Plugins
Just like any other web browser, Google Chrome also makes use of plugins to enable support and compatibility for various types of web-based contents. For instance, Adobe Flash plugin will allow you to play Flash based web content on your Google Chrome browser, Chrome PDF Viewer will enable you to open and view PDF documents on the Chrome web browser. These plugins comes preinstalled with Google Chrome.
If your Google Chrome web browser has any rarely used plugin then you have two possible options to make Google Chrome fast:
- Option (A) – You can disable it. Or,
- Option (B) – Control when the plugins should run using the Google Chrome’s advanced plugin settings.
Option (A) – Disabling Any Specific Plugin
If you want to disable any rarely used Google Chrome plugin then follow the step by step process outlined below.
Step #01 – To open the Google Chrome Plugins page, in the address bar located at the top, type the URL chrome://plugins, and press enter key on the keyboard.

Step #02 – On this page you will see a list of all the plugins that are already installed and activated on your Google Chrome web browser.
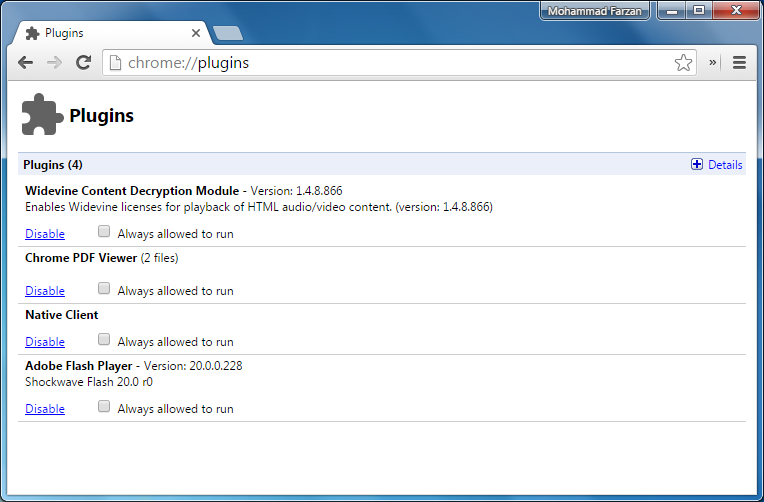
Step #03 – To disable any plugin from your Chrome browser, simply click on the disable button located right below that plugin name. Here I am going to disable Widevine Content Decryption Module (CDM).

Step #04 – Once the plugin has been successfully disabled, that plugin will become inaccessible and the colour will be greyed out.
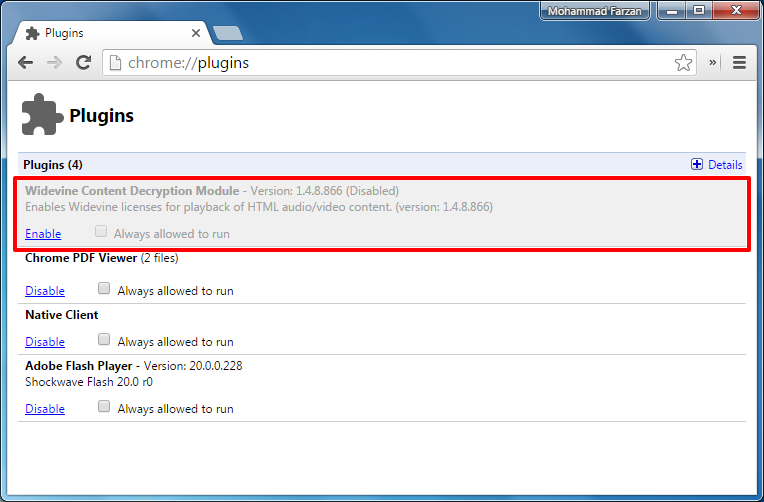
You have successfully disabled the plugin.
Option (B) – Using Google Chrome’s Advanced Plugin Settings
In case you want to control the working of Chrome’s plugin through advanced plugin settings then follow the steps given below.
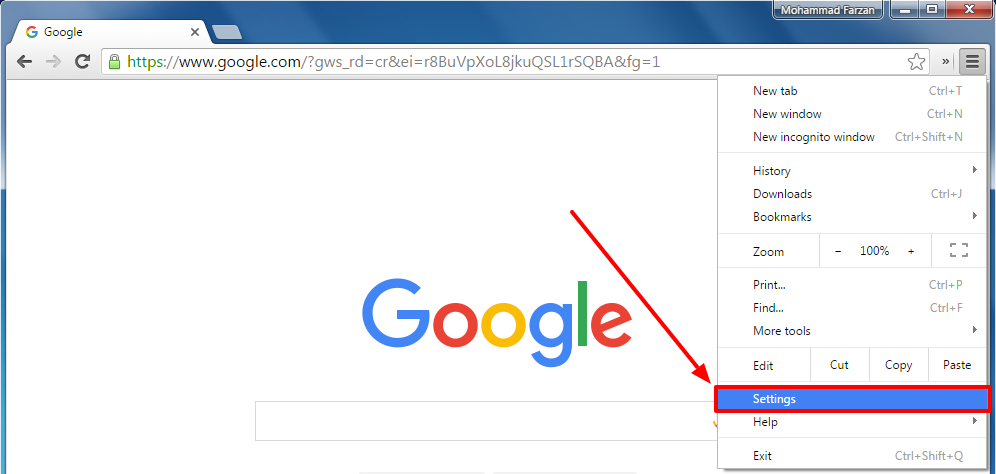
Step #01 – Click on the Google Chrome Menu icon (located in the tool bar at the upper right corner of the web browser) to open the Chrome drop down menu.
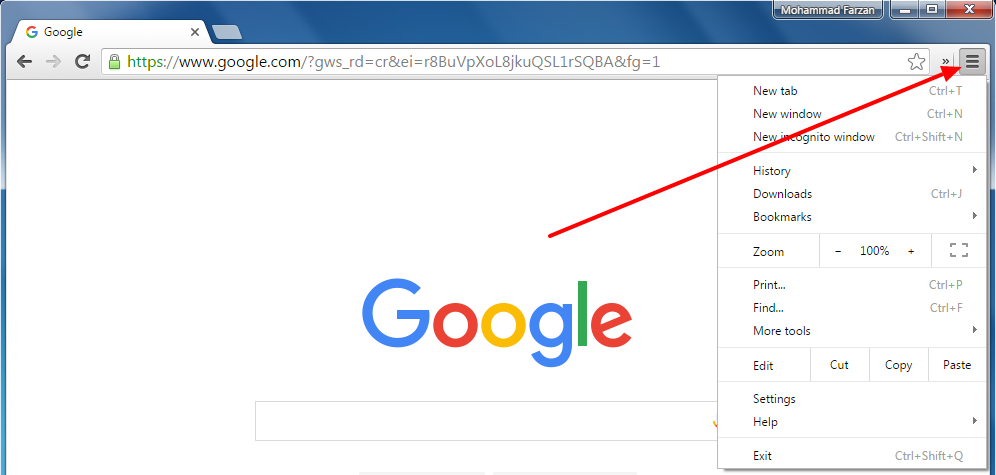
Step #02 – Click on the “Settings” option.
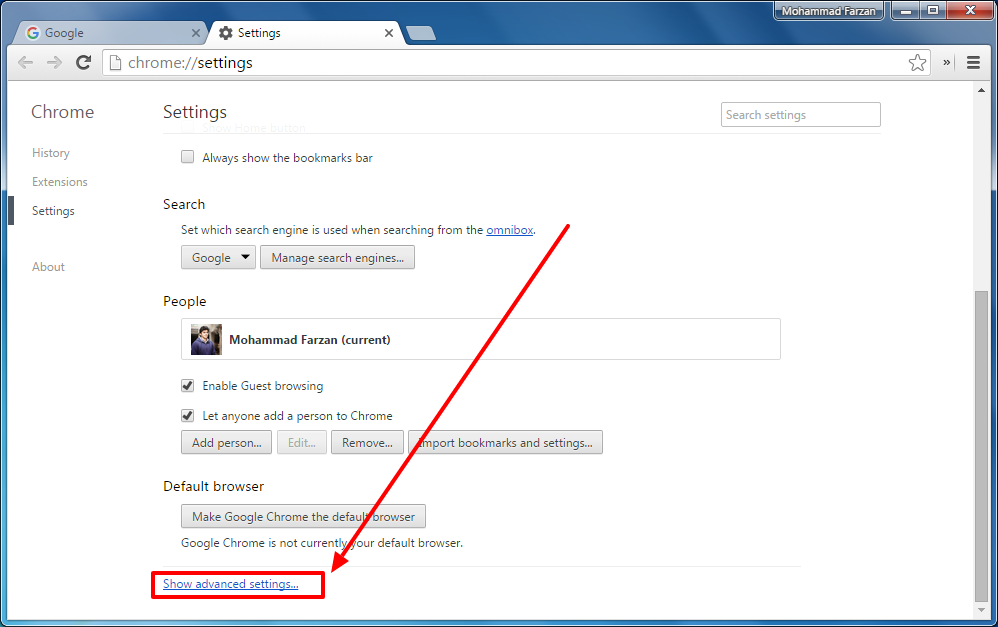
Step #03 – Scroll to the end of the Settings page where you will find a text that reads, “Show advanced settings…”, click on this text to reveal advanced settings and configurations.
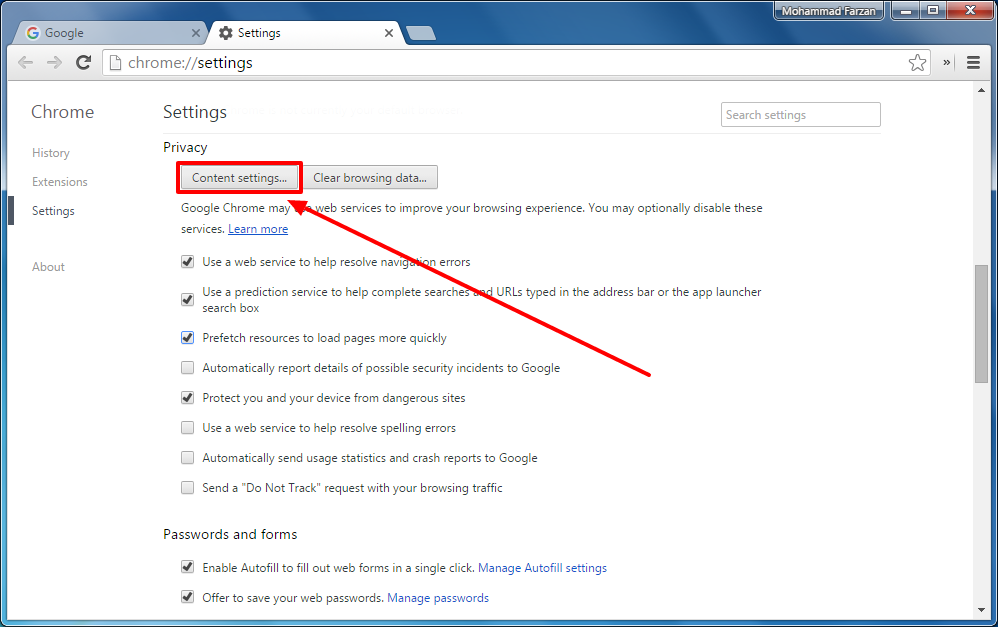
Step #04 – Now you have to scroll down a bit until you find a section named, “Privacy”. Under the “Privacy” section, there will be a button that says, “Content settings…”, click on it.
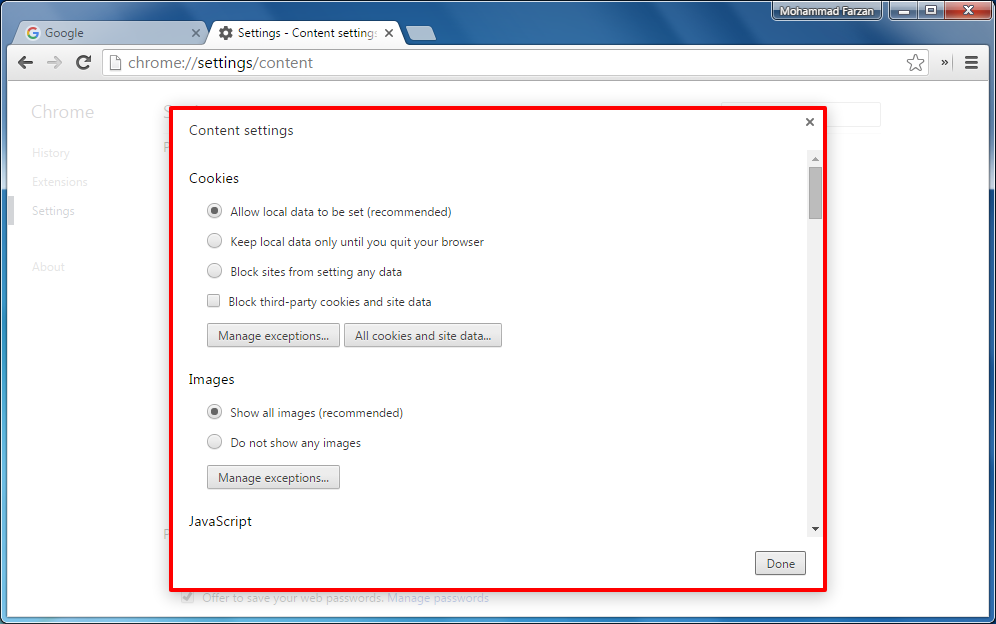
Step #05 – This will open the Content settings popup window.
Step #06 – Now, scroll down until you find a section the “Plugins” section.
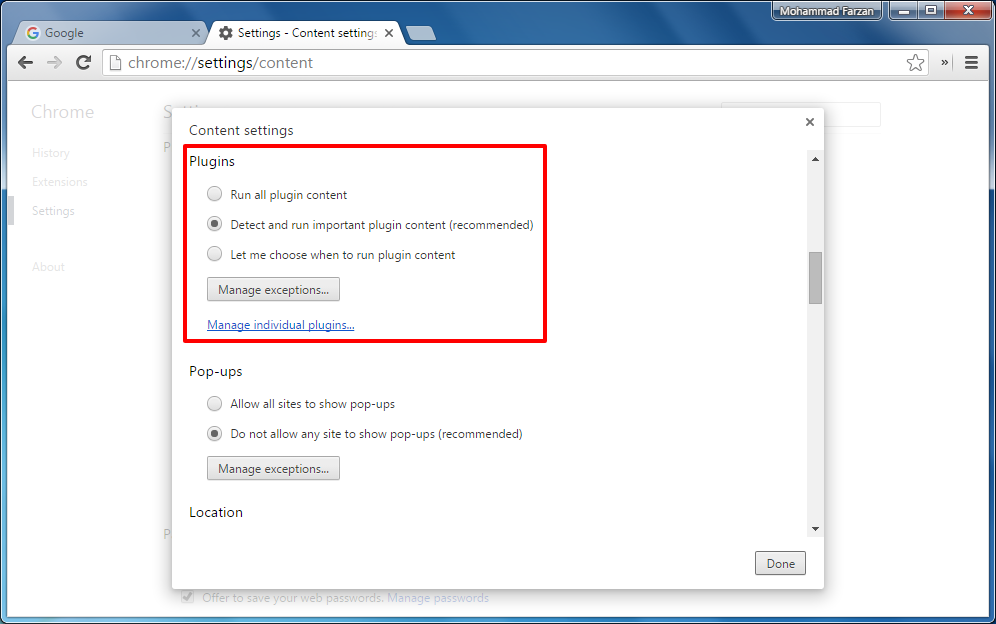
Here you will find following three options:
- Run all plugin content: Selecting this option will allow the Chrome browser to run all the available plugins.
- Detect and run important plugin content (recommended): This option allows the Chrome browser to run only important plugins. If any other plugin is required on the web page to show any specific content then Chrome will prompt you to click on the play button to run the necessary plugin.
- Let me choose when to run plugin content: This option will force stop the Chrome browser from running any plugin automatically. After selecting this option, if you want to run any specific plugin then you can do so by right clicking on the web page content and then choosing “Run this plugin”.
Make your selection depending on your web browsing needs and requirements.
Step #07 – (OPTIONAL STEP, FOR ADVANCED USERS) – Right below these options, there is a button that reads, “Manage exceptions…”, clicking on this button will open the Plugin exceptions page that will let you enable and disable plugins for specific domain.
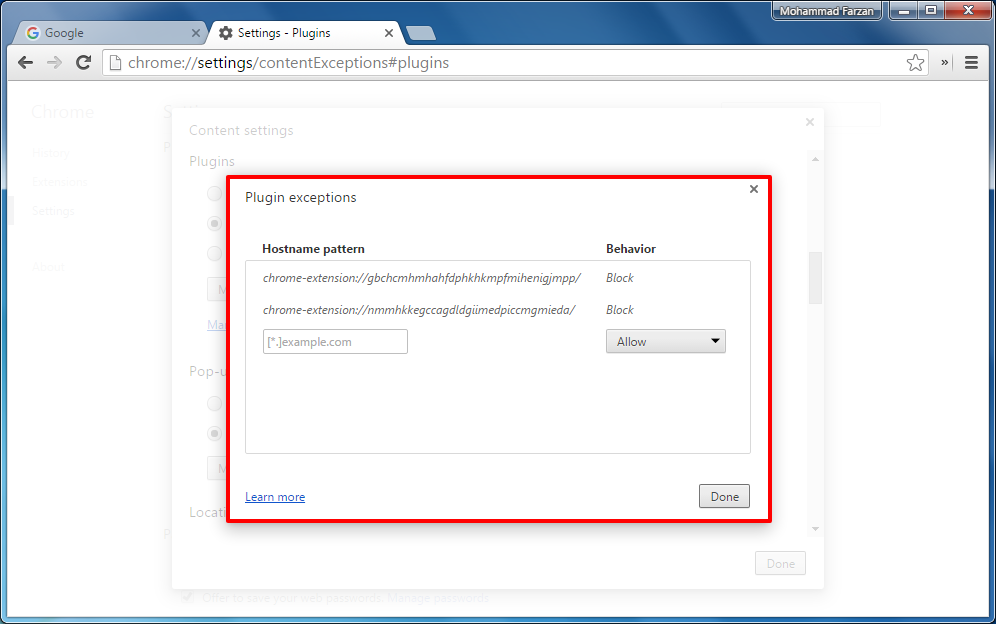
All you need to provide is the domain name and the plugin behaviour from the drop down list, which includes allow, block, or detect content.
For illustration purpose, I am going to show you how to block all the Chrome plugins on google.com as well as all its sub-domains like drive.google.com and maps.google.com then you have to make the following entry:
- Hostname pattern: [*.]google.com
- Behaviour: Block
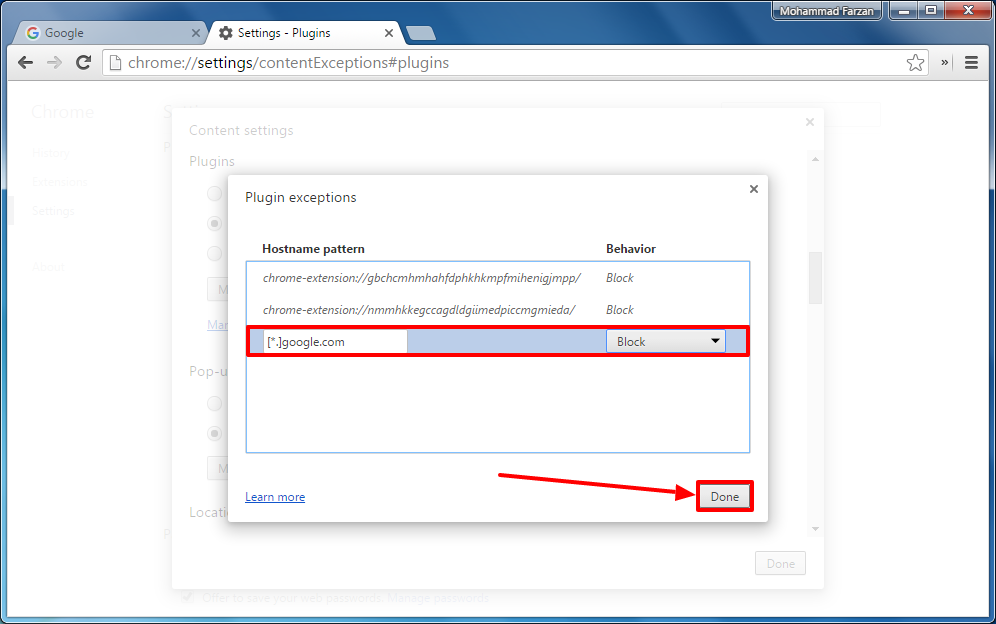
Click on the “Done” button to save changes.
Now all the plugins will be automatically blocked whenever you access google.com or any other google.com sub-domains. Furthermore, the Chrome web browser will also show you a notification whenever any plugin is blocked.
Step #08 – Click on the “Done” button on the Content Settings page to save all the changes.
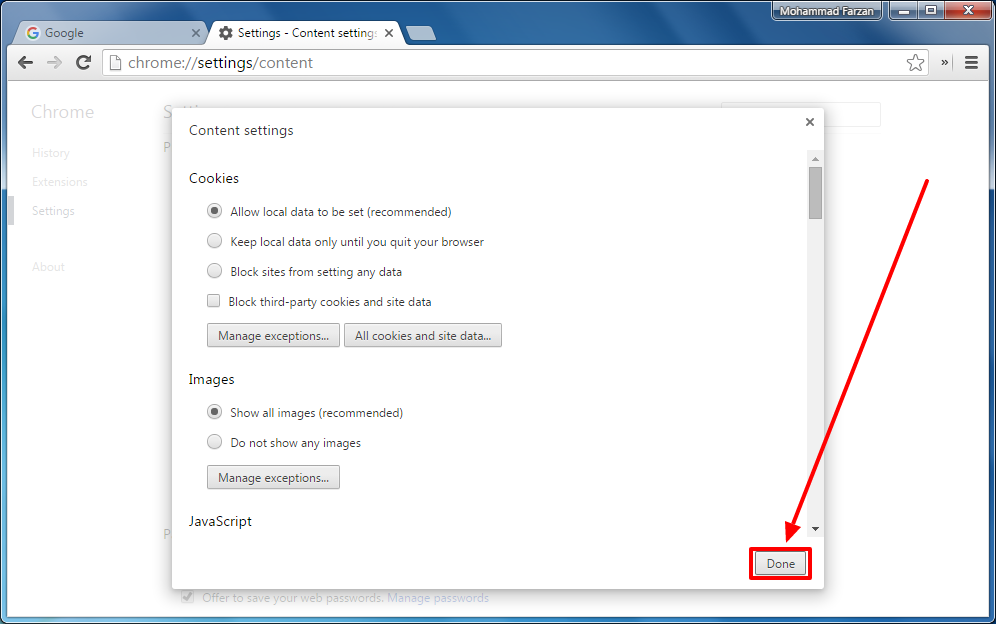
Congratulations! You have successfully configured your Google Chrome plugins.
Tip #05 – Deactivate or Remove Unnecessary Extensions
Google Chrome allows you to install and add extensions so that you can add additional functionalities and features to the web browser. No doubt, installing extensions on your Chrome browser are great to enjoy custom features, but installing large number of extensions could simply lead to slow web browsing experience instead of making your tasks easier.
It has been observed from time to time that using out dated and un-optimized extensions on your browser will negatively affect your web browsing experience and will also result in an unresponsive Chrome web browser errors.
To make Google Chrome fast again, we will recommend you to either deactivate rarely used extensions or completely remove pointless and out of date extensions from your browser. To do so, follow the steps outlined below.
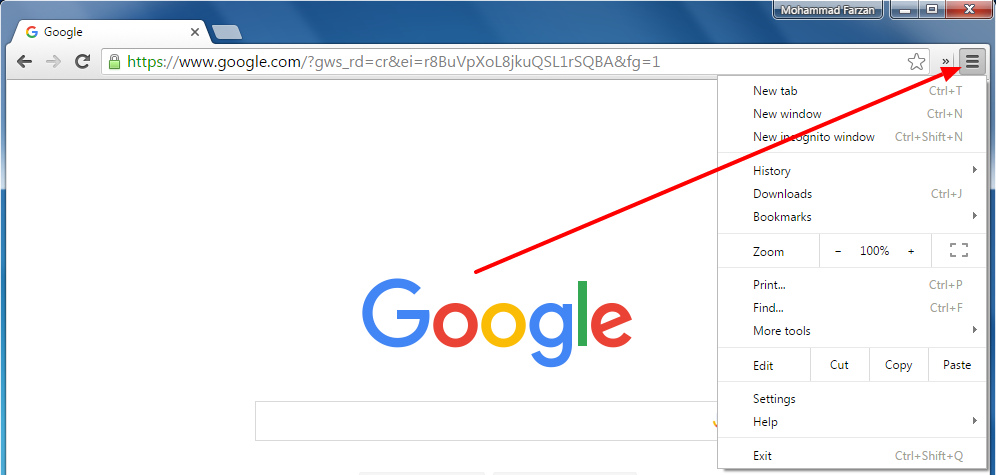
Step #01 – Click on the MenuGoogle Chrome Menu IconGoogle Chrome Menu Iconicon (located in the tool bar at the upper right corner of the web browser) to open the Chrome drop down menu.
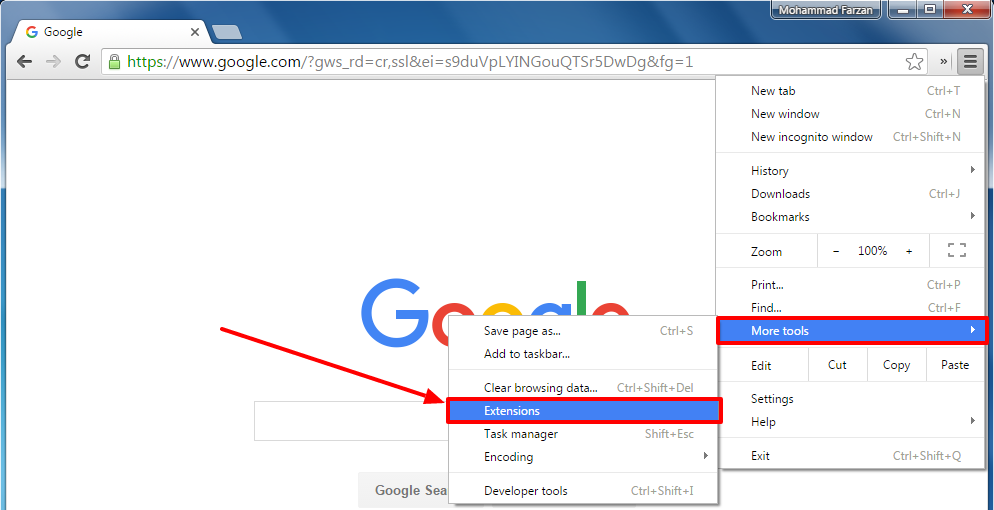
Step #02 – Select the “More tools” option, and then click on the “Extensions” option.
Alternatively, to open the Google Chrome Extensions page, in the address bar located at the top, you can type the URL chrome://extensions, and press the enter key on the keyboard. This will take you directly to the Extensions page.
Step #03 – Once the Extensions page has been opened, you will see a list of all the extensions that are installed on your Chrome web browser.
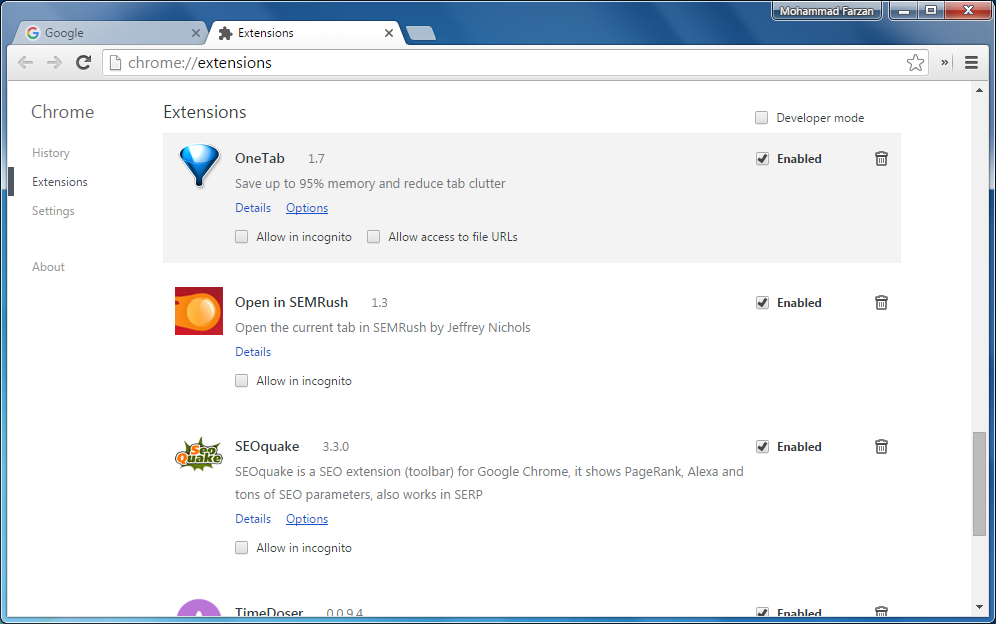
From here, you can manage your extensions by either temporarily disabling any extension or removing the extension permanently from your Chrome browser.
Option (A) – Disabling the Extension – To disable any enabled extension from your Chrome browser, simply click on the “Enabled” check box located right next to the extension.

Now, once the extension has been successfully disabled, that extension will become inaccessible and the colour will be greyed out.
Option (B) – Removing the Extension – To remove any extension from your Chrome web browser, simply click on the “Remove from Chrome…” 
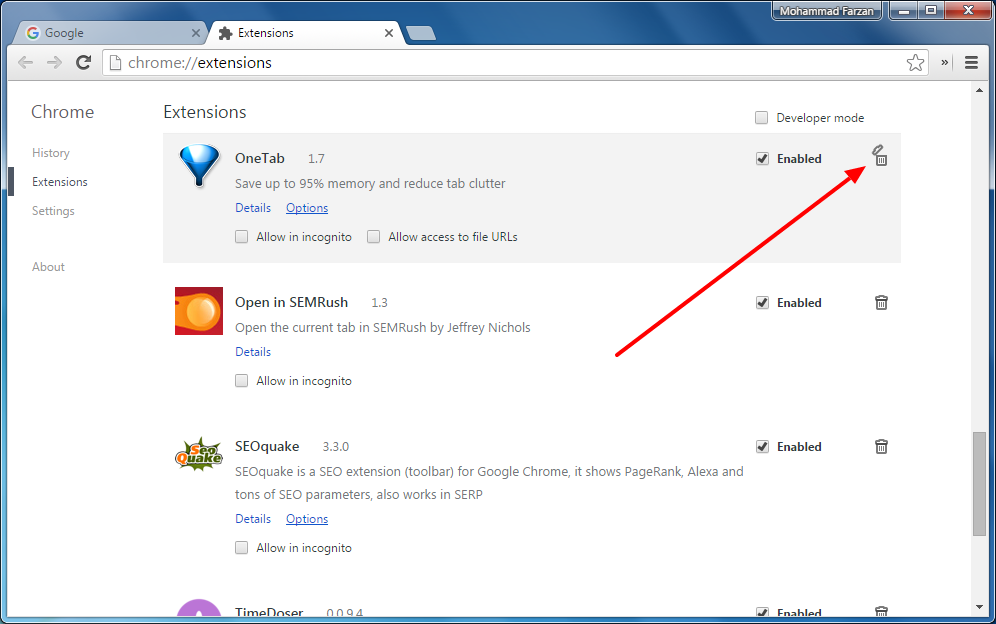
A Confirm Removal pop-up notification will appear, prompting you to confirm if you really want to remove the extension. Click on the “Remove” button to successfully remove the extension from your Chrome web browser.
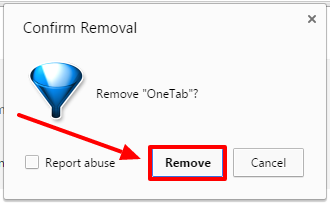
Congratulations! Your selected extension has been removed from the Chrome browser.
Tip #06 – Disable Hardware Acceleration Feature
It was discovered accidentally but yes, disabling hardware acceleration feature of the Google Chrome web browser has actually fixed slow Chrome problem for a lot of frustrated users. And whether you are running the web browser on Windows or Mac based operating system, disabling hardware acceleration will have a significant impact on the overall promptness of the Google Chrome web browser.
The procedure to disable hardware acceleration feature on your Chrome web browser is as follows.
Step #01 – Click on the MenuGoogle Chrome Menu IconGoogle Chrome Menu IconGoogle Chrome Menu IconGoogle Chrome Menu IconGoogle Chrome Menu IconGoogle Chrome Menu IconGoogle Chrome Menu Iconicon (located in the tool bar at the upper right corner of the web browser) to open Google Chrome drop down menu.
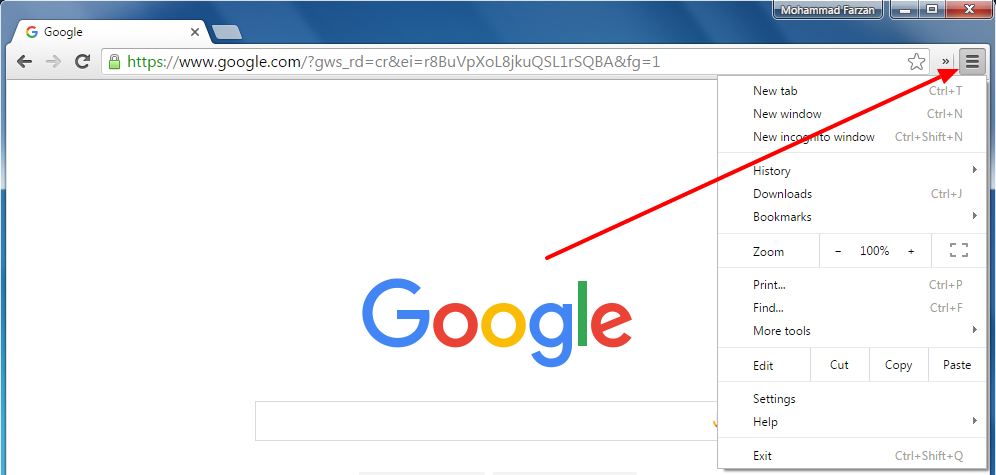
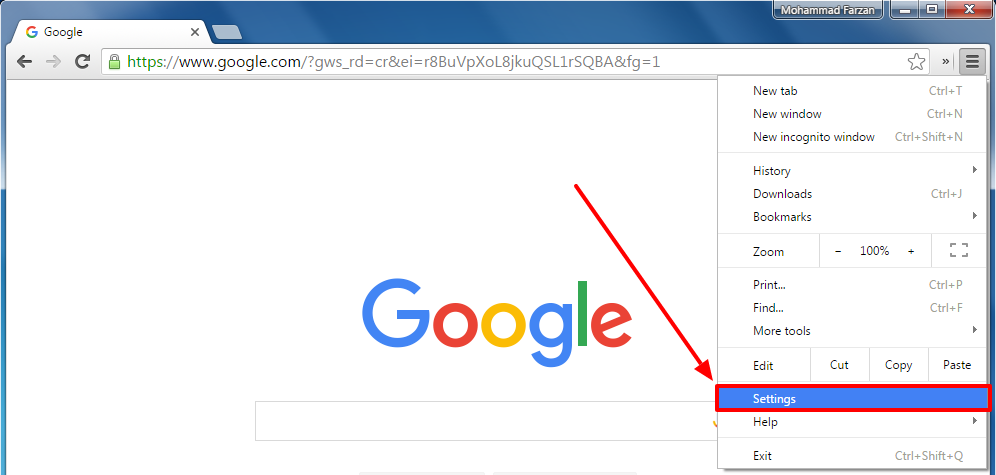
Step #02 – Click on the “Settings” option.
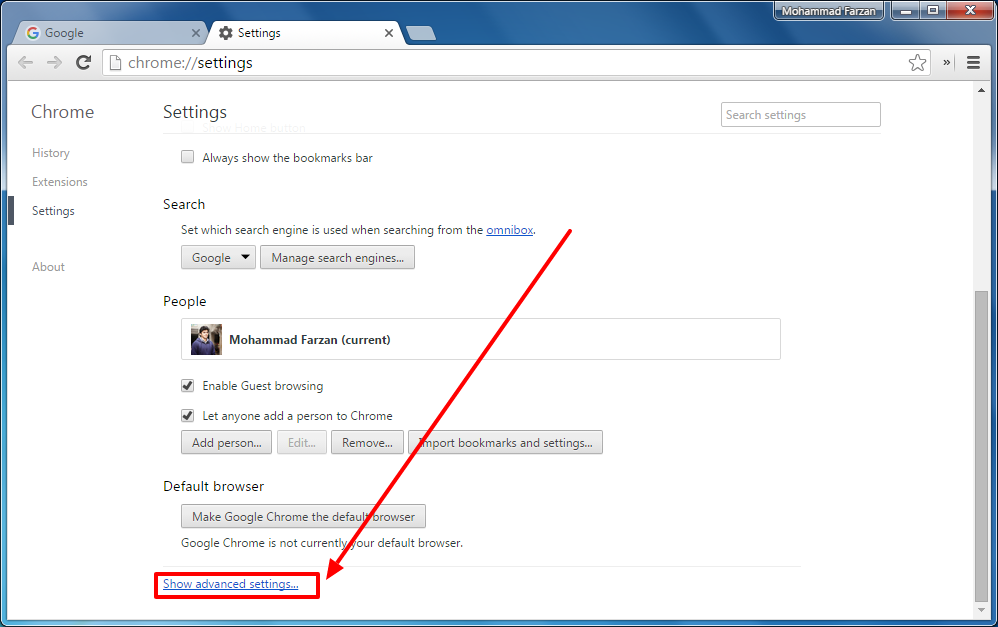
Step #03 – Scroll to the end of the Settings page where you will find a text that reads, “Show advanced settings…”, click on this text to reveal advanced settings and configurations.
Step #04 – Now you have to scroll down further until you find a section named, “System”.
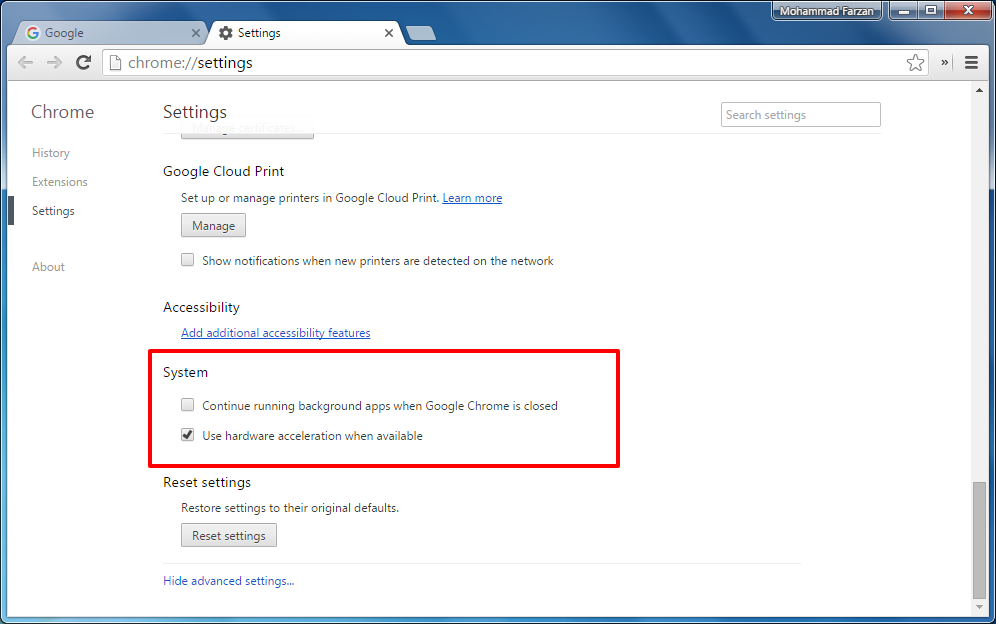
Step #05 – Under the “System” section, there will be a check box that says, “Use hardware acceleration when available”. Simply click on the check box to disable the hardware acceleration feature.

Step #06 – The moment you untick the hardware acceleration feature, a text will appear right after it that reads, “Requires Chrome restart”.
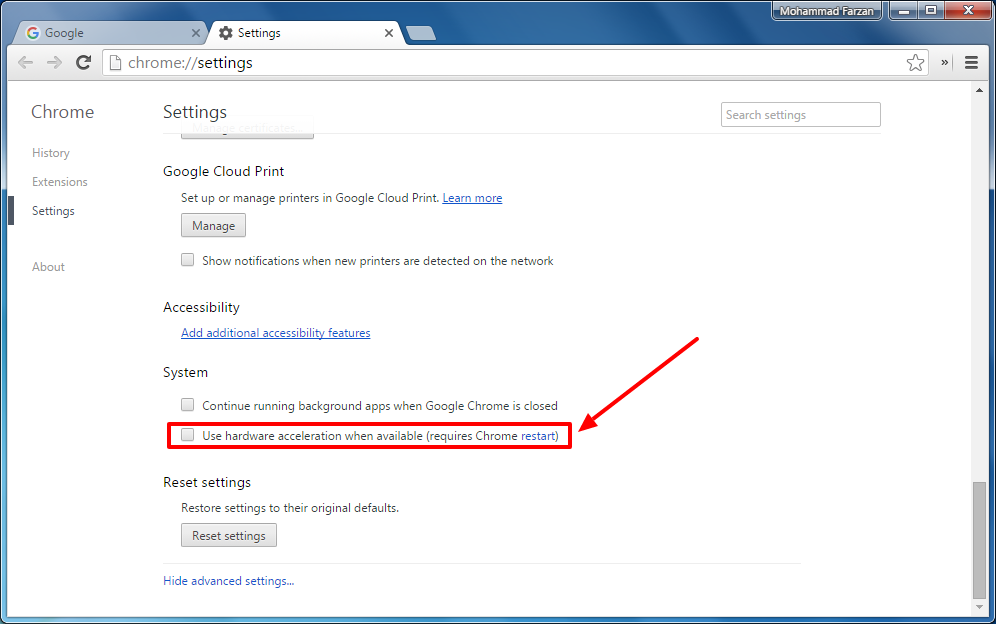
It is recommended to click on the “restart” link to restart your browser and allow Google Chrome to apply the changes. Or else, if you are doing something important, then you can manually restart the browser anytime later.
Tip #07 – Learn To Use Google Chrome Task Manager
If you are aware about the working of Microsoft Windows operating system and have some technical knowledge about its working then you must be aware about the task manager.
In a similar manner, Google Chrome also has its own in-built task manager, which helps you in having a glimpse over the browser as well as all the processes that are running behind your browser. Apart from the processes, you can also observe how much of your computer’s memory, network activity, CPU’s processing power, and other additional resources that are being consumed by any particular website.
Using the Google Chrome task manager, you can not only see the processes, but it also allows you to have a look at which tab or website is consuming the maximum resources and hogging your computer’s memory, and let you end that specific resource hungry process with just a click of a button. This way, you can regain those valuable resources of your computer and make Google Chrome fast and speedy.
Here’s how you can use the Google Chrome task manager to manage tabs, apps, extensions, and your browser.
Step #01 – Click on the Google Chrome Menu icon (located in the tool bar at the upper right corner of the web browser) to open the Chrome drop down menu.
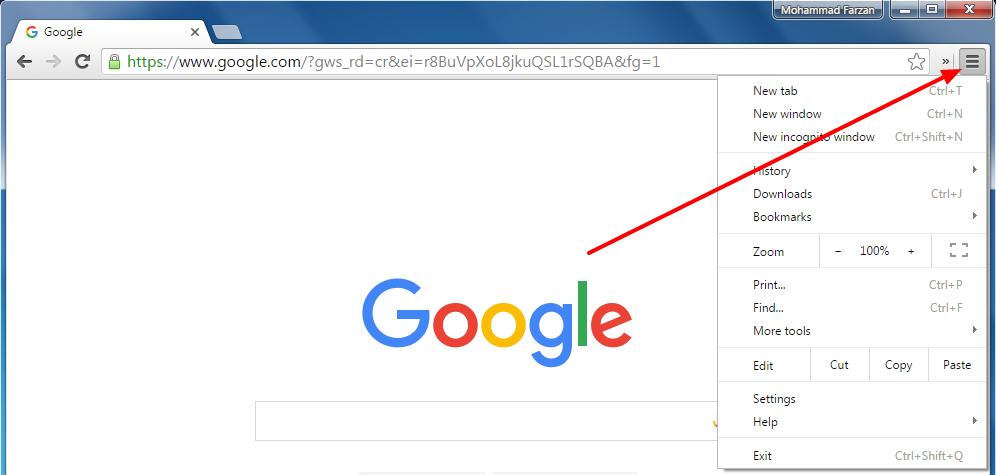
Step #02 – Select the “More tools” option, and then click on the “Task manager” option.
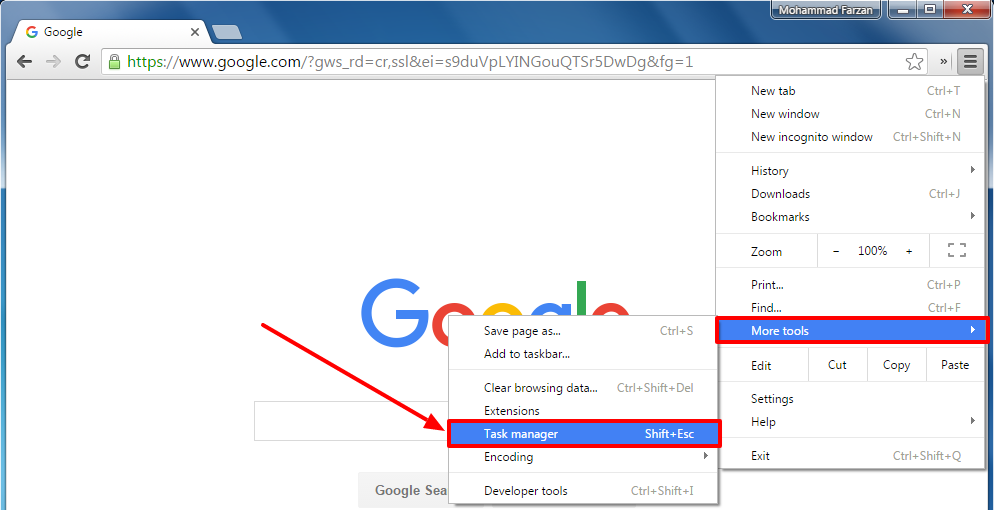
Alternatively, to open the Google Chrome task manager window, you can make use of a predefined keyboard shortcut keys i.e. simultaneously press the Shift and the Esc on the keyboard. This will bring up the task manager with in a least possible time.
Step #03 – Once the task manager window has been opened, you will see a list of all the tasks that are running on Google Chrome web browser including the extensions, apps, and the web site tabs.
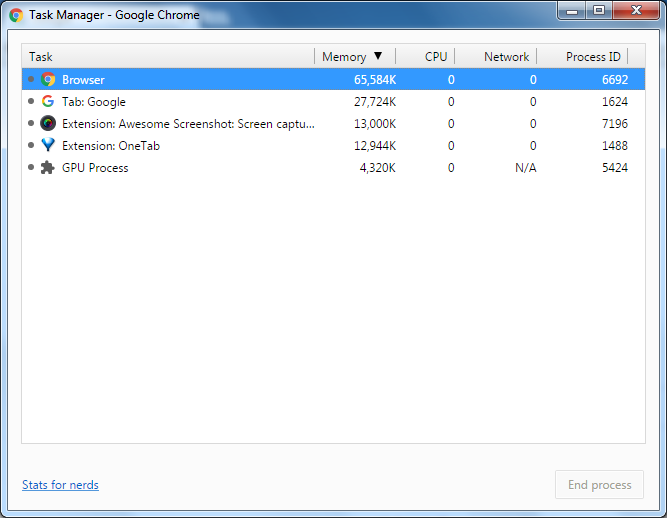
From this window, you can review, manage, and also end any of the task and as well monitor all the activities of your Google Chrome browser.
If you are interested in reviewing in-depth information about the running tasks and how each one of them are affecting your computer’s performance then you can enable additional detail columns to have a look at how those resources are being consumed.
To enable additional tabs, right click within the task manager window and you will see a list of all the available columns you can enable.
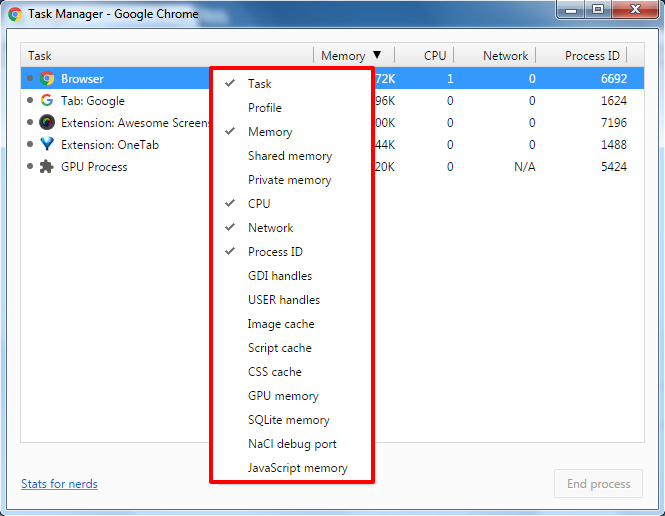
Simply left click on any option you want to enable and the details will be displayed within its specified column.
Tip #08 – Enabling Google Chrome Flags
Google Chrome flags are believed to be hidden page of experimental features but in reality it is not really hidden actually, all you need to do to access these features is to enter its specific URL, and this URL is similar to that of extensions and plugins.
Chrome flags allow you to improve your overall web browsing experience, and it will also let you make use of new features that are still under their development phase and are not yet ready for the regular users due to some glitches and issues.
IMPORTANT: Google Chrome flags are not part of the stable Chrome releases, but still some features are included within the stable version and are named as flags so that advanced users can make use of those experimental features, which are not yet polished enough for prime users. These flags could be full of bugs and could cause unresponsiveness at any moment. Enable or use them at your own risk.
Here are the steps you can follow to access and enable Google Chrome flags on your browser.
Step #01 – To open the Google Chrome flags page, in the address bar located at the top, type the URL chrome://flags and press the enter key on the keyboard.

Step #02 – Once Chrome flags page has been opened; it will greet you with a warning.

And right after the warning, you will see a long list of flags (experimental features) that you can enable or disable to improve your Google Chrome usability experience.
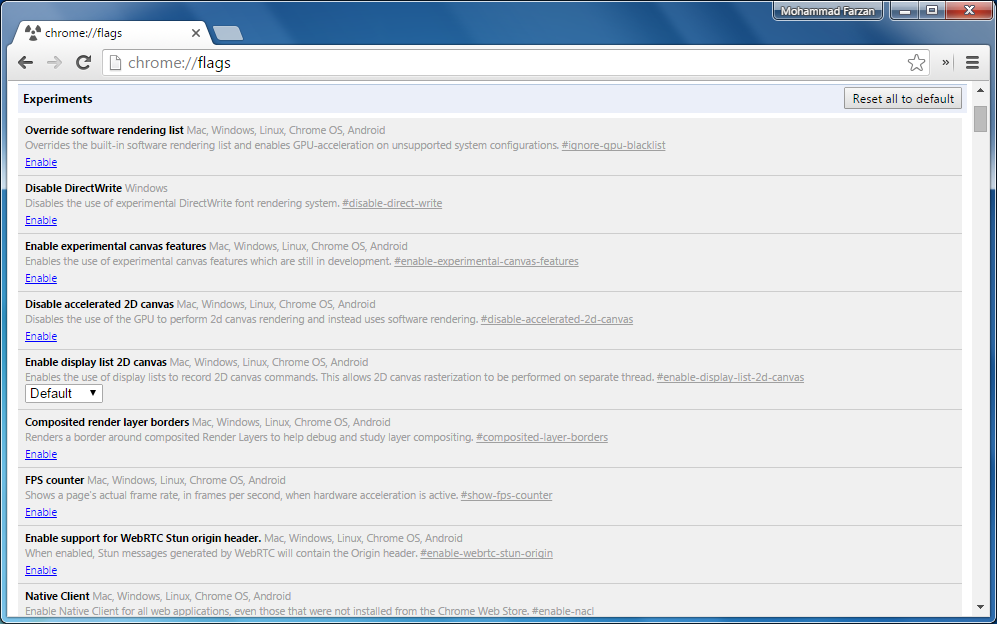
Every flag has its own small description that provides you with a glimpse about what this flag actually does.
Step #03 – As you would have already seen that the list is quite extensive and searching for any specific flag will require a lot of time and patience, so to make things simpler and easier for you, we will recommend you to make use of Google Chrome’s built-in search tool i.e. the Find tool to search for a flag.
You can easily access Find tool by pressing shortcut keys, Ctrl and F, on your keyboard. A new bar will open in the upper right side of the browser where you can enter your search query for any specific flag.

Step #04 – Once you have found the flag you were searching for, you might have any one of the two options, there could be:
- A drop down list that might say “Default”, or

- An “Enable” button

It depends on the flag you are going to use.
Step #05 – To enable the flag, depending on the flag you are enabling, simply click on the “Enable” button or use a drop down list to select “Enable” option.

Step #06 – Once you have clicked on the “Enable” button of the flag, you will see that a new frame has appeared at the bottom of your Google Chrome browser, which reads: “Your changes will take effect the next time you relaunch Google Chrome”
Also, there will be a “RELAUNCH NOW” button; clicking on this button will restart your Chrome browser.
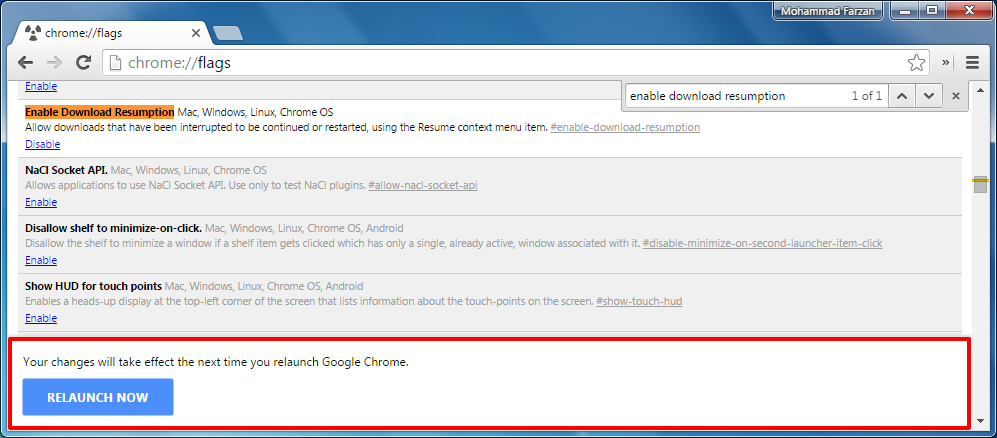
Furthermore, when you click on the Relaunch Now button, the browser automatically saves all of your opened tabs and windows for you and then reopens them automatically when the browser restarts.
Step #07 – In case you feel like your Google Chrome web browser has become unstable and unresponsive after enabling any flag or a number of flags, and you don’t know which one of the enabled one is causing the issue then Chrome has a solution for you too.
They have provided a “Reset all to default” button that you can use to reset all the changes you made to the Google Chrome flags page to its default settings. This button is located at the top right corner of the Chrome flags page (as shown in the screenshot below).
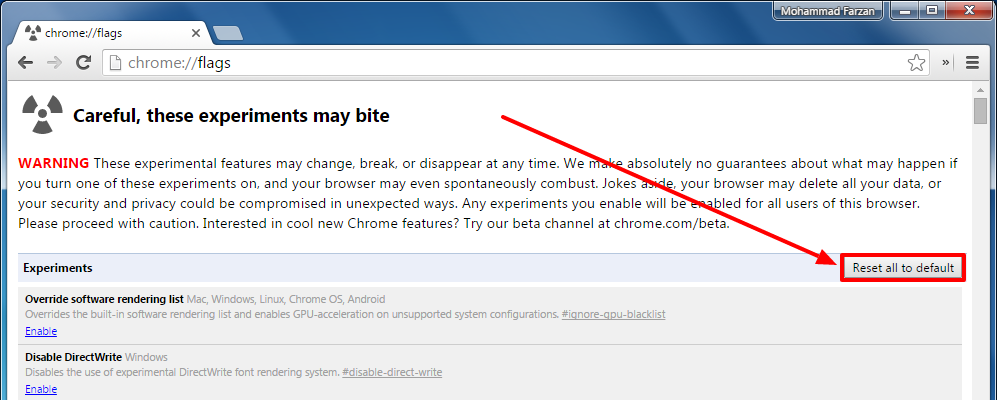
That is all you need to know about enabling, disabling, and modifying your Google Chrome flags page. Now head over to the next part that guides you about which flag you should enable to improve the overall performance of your Google Chrome web browser.
Which Google Chrome Flags You Should Enable?
This section will guide you about the eight Google Chrome flags that you might want to enable to improve your overall web browsing experience as well as the performance improvements on the Google Chrome.
NOTE: Since Google Chrome is compatible with multiple platforms including Windows, Mac, Linux, Chrome OS, and Android, which is the reason why some of the tweaks might be unsupported on specific platform.
- Enable Download Resumption – As the flag name suggests, enabling it will provide you with an easy to use option to resume any download that has been either interrupted or restarted due to the Internet connectivity issues or any other internal problem.
- Compatibility: Mac, Windows, Linux, and Chrome OS
- Direct Chrome Flags Link: “chrome://flags/#enable-download-resumption”
- Enable Fast Tab/Window Close – Enabling fast tab/window close flag will speed up the overall time the browser takes to close a tab or window. If you feel that Google Chrome takes a while to close a tab or window and you don’t want to wait then this flag would be suitable for you.
- Compatibility: Mac, Windows, Linux, Chrome OS, and Android
- Direct Chrome Flags Link: “chrome://flags/#enable-fast-unload”
- Smooth Scrolling – Enabling smooth scrolling flag will make your page scrolling experience smoother and lag-free. If you are using Google Chrome for a while and open more than a dozen of tabs at a time then you must have experienced laggy scrolling. Enabling this Chrome flag will make that web page scrolling experience smooth.
- Compatibility: Windows and Linux
- Direct Chrome Flags Link: “chrome://flags/#enable-smooth-scrolling”
- Enable Password Generation – A very valuable feature, though it has been under development phase for a very long time now. This is the Chrome’s very own complex passwords generator tool and is integrated right into the browser but still at a beta phase may be due to some implementation or compatibility issues. However, you can enable this flag right now and let the Google Chrome automatically suggest hard-to-guess passwords for you.
- Compatibility: Mac, Windows, Linux, Chrome OS, and Android
- Direct Chrome Flags Link: “chrome://flags/#enable-password-generation”
- Number of Raster Threads – Are you experiencing slow image loading times on Google Chrome even though you have a high-speed Internet connection? You should modify the number of raster threads to “4”. Modifying this to its maximum value will decrease the overall time required to load images.
- Compatibility: Mac, Windows, Linux, Chrome OS, Android
- Direct Chrome Flags Link: “chrome://flags/#num-raster-threads”
- Enable Tab Discarding – No matter how strategically Google has designed their Chrome web browser so it have a limited footprints on the computer’s resources, if you casually opens dozen of tabs then Chrome is going to hog the resources causing low memory issues, even if you are not using those tabs. This is where the tab-discarding feature comes to the rescue. Enabling it will efficiently reduce the overall memory footprint of each of the tabs that are opened but not being used by discarding them.
- Compatibility: Windows and Mac
- Direct Chrome Flags Link: “chrome://flags/#enable-tab-discarding”
- Enable Touch Initiated Drag and Drop – If you are using Google Chrome on a device that is touch capable then we would recommend you to enable this flag as it would allow you to use a drag and drop feature. Once enabled, you would be able to long press on an element, drag it to the desired location and drop it there by letting your finger off the screen. You can achieve all that just using your finger and a touch screen device running Windows operating system.
- Compatibility: Windows and Chrome OS
- Direct Chrome Flags Link: “chrome://flags/#enable-touch-drag-drop”
- Enable Show Saved Copy Button – Have you ever seen a no connection error message on your web browsing due to the no Internet connectivity even though you had opened that same page earlier? You must be sitting there wondering what the cache is for, right? Now you won’t need to. Simply enable the show saved copy button on your Chrome browser and then afterwards whenever you come across the no Internet connectivity error, there would be a “Show Saved Copy” button too. Clicking on it would take you to the stale (cached) version of that URL.
- Compatibility: Mac, Windows, Linux, Chrome OS, and Android
- Direct Chrome Flags Link: “chrome://flags/#show-saved-copy”
Mentioned above are some of the Google Chrome flags that I have been using on my browser without any issues. Enabling them should make a significant positive impact on your overall web browsing experience on the Google Chrome web browser.
Though, not every computer is same. We will still recommend you to enable these flags at your own risk. And in case you run into any problem then use the “Reset all to default” button as we already mentioned in Step #07 in the above guide.
Tip #09 – Keep Your Browser Up To Date
This is one of the most basic technique to keep your web browser’s performance at its peak. It is recommended to always have an up to date browser to have a bug and issue free Google Chrome browser on your computer.
However, in most of the cases, Google Chrome is updated automatically in the background when you close or reopen the browser. But in case you have not closed or restarted your browser for a while or you are out of the Internet connectivity or working offline, then your computer might not be running the most up to date version of the Google Chrome browser.
Here’s how you can check for the latest version of the Google Chrome web browser and whether your computer is running the most up to date version or not.
Step #01 – Click on the Google Chrome Menu icon (located in the tool bar at the upper right corner of the web browser) to open the Chrome drop down menu.
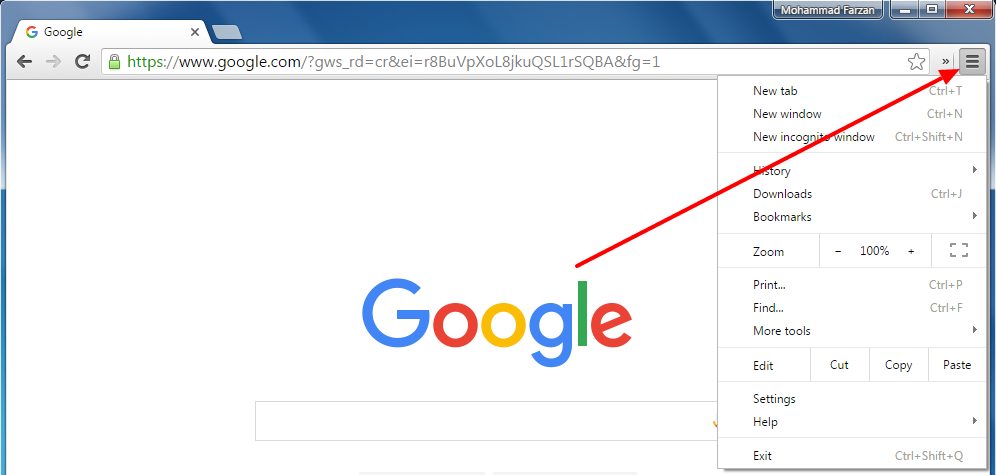
Step #02 – Select the “Help” option, and then click on the “About Google Chrome” option.
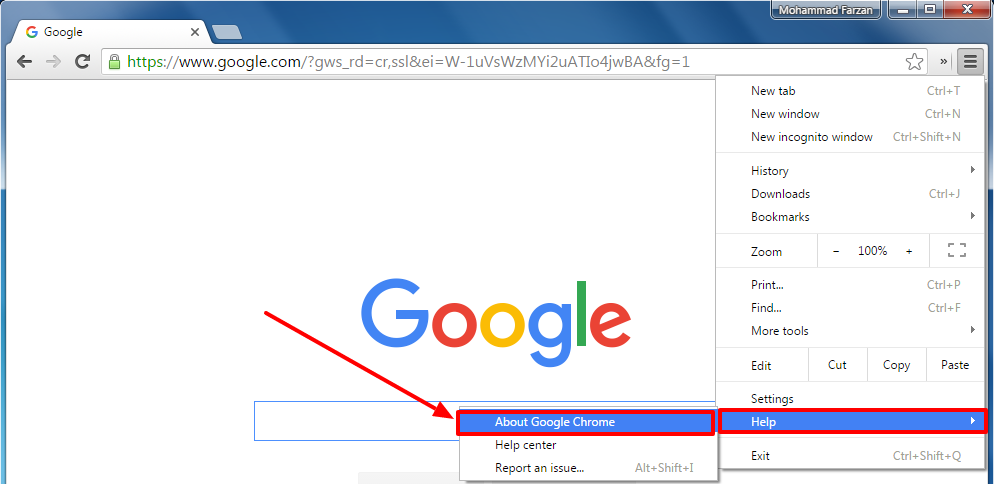
Step #03 – Once the About Google Chrome window has been opened, you will see a version of web browser running on your computer. And the Google Chrome will automatically begin checking for any latest updates.
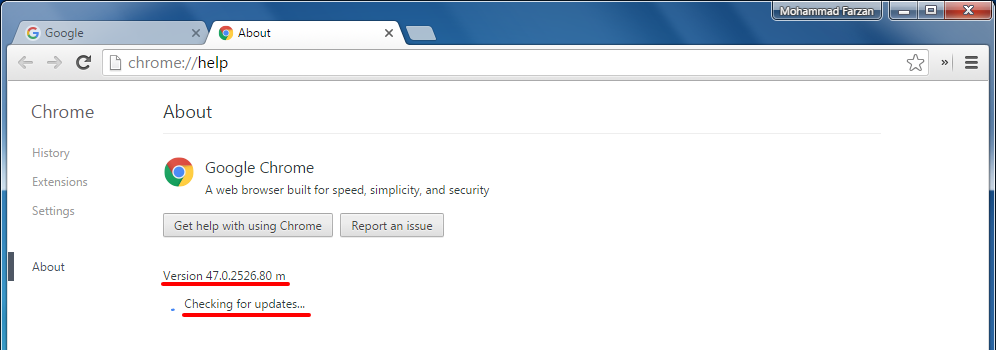
If your computer is running the most recent version of Google Chrome web browser then right below the version number, you should see a text that says, “Google Chrome is up to date.”
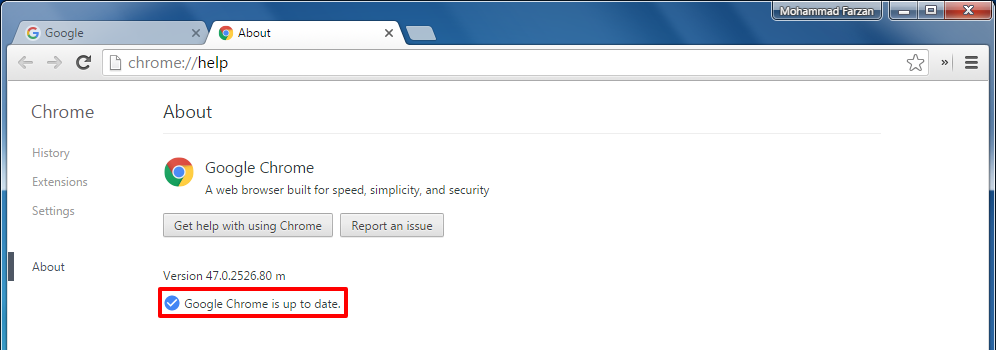
Else, if this is not the case, then Google Chrome should prompt you to update your browser to the latest version.
Tip #10 – Scan Your Chrome Browser Using Google Chrome Cleanup Tool
Last, but not the least. If you are running Google Chrome web browser on a Microsoft Windows computer then there might be an unwanted program, software, or malware that might be negatively affecting your web browser’s performance.
To help you scan your computer and remove any unwanted program, application, or malware from the computer and make Google Chrome fast again, then we will recommend you to download and run the Chrome Cleanup tool designed for computers running Microsoft Windows operating system.
Running this program will search and scan your computer for suspicious programs that might have modified or altered your web browser’s settings without your permission.
According to the Google’s official website:
will scan and remove software that may cause problems with Chrome, such as crashes, unusual startup pages or toolbars, unexpected ads you can’t get rid of, or otherwise changing your browsing experience.
In most of the cases, Google Chrome web browser is smart enough to detect any unusual or unexpected activity or changes within your browser, and then automatically alert you to download the Chrome Cleanup Tool so that the application can fix any unwanted modification.
Here is a simple and easy to follow instructions to download, run, and scan your Google Chrome web browser with Google Chrome Cleanup tool.
Step #01 – Using any web browser, go to the Google Chrome Cleanup Tool page by accessing the Google’s official website: https://www.google.com/chrome/cleanup-tool/

Step #02 – When the web page has been loaded, click on the “Download now” button.
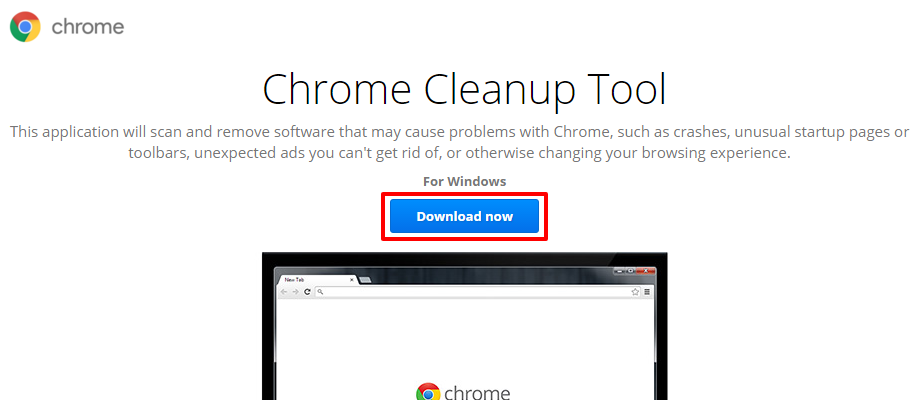
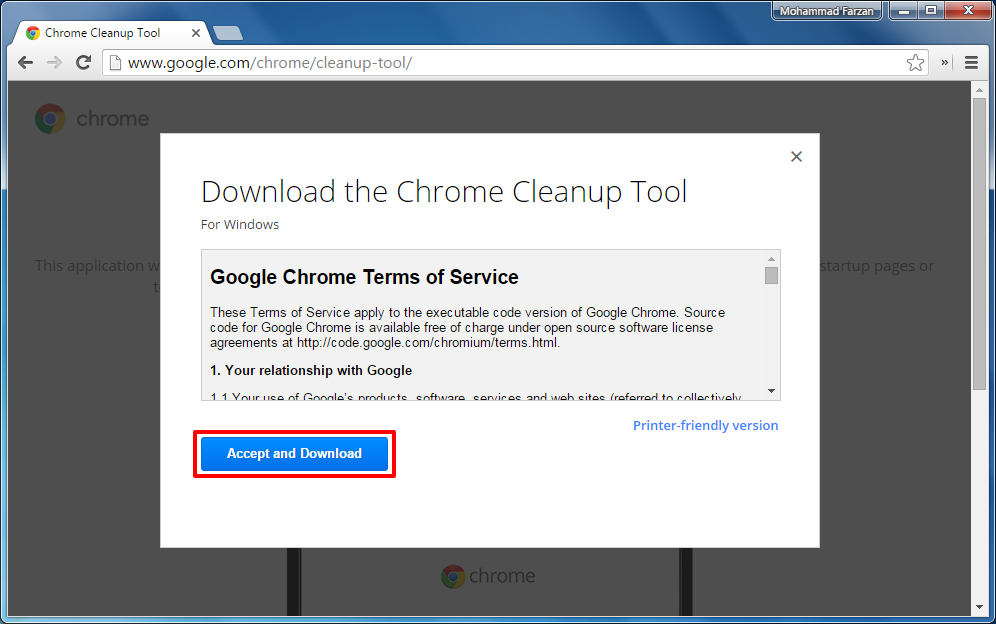
Step #03 – Clicking on the blue “Download now” button will pop-up a Google Chrome terms of service window, which will ask you to accept the term first before beginning the download.
Click on the “Accept and Download” button to begin downloading Chrome Cleanup Tool.
Step #04 – The file size would be equal to 4.00MB to 4.50MB, and should be downloaded within a minute, depending on your Internet connection speed.
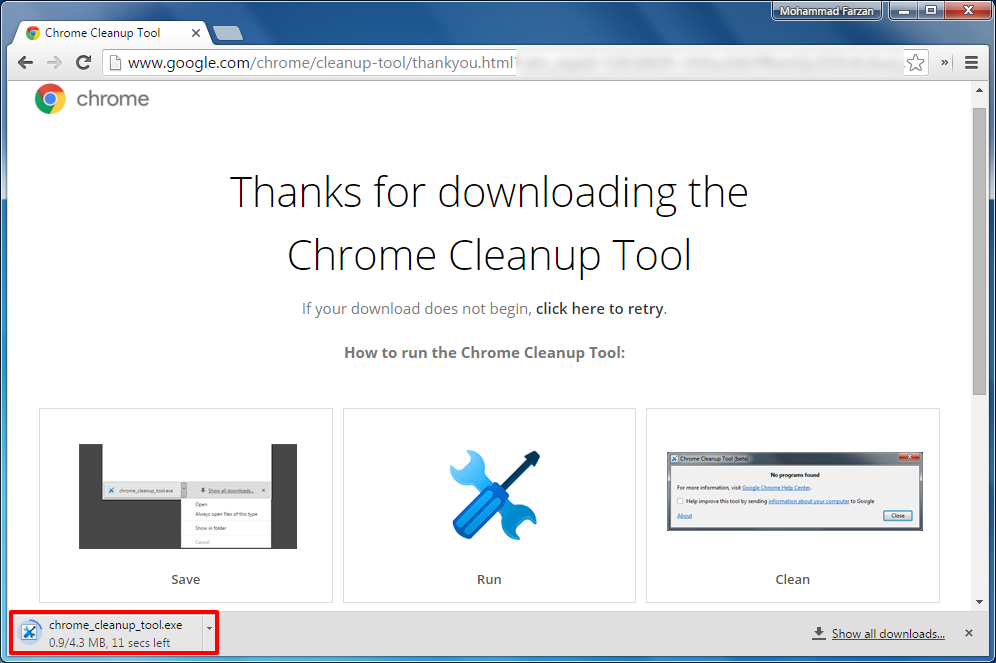
Step #05 – Once it has been downloaded, launch the Google Chrome Cleanup Tool. The application will immediately begin searching for any unusual programs that are installed on your Chrome browser.
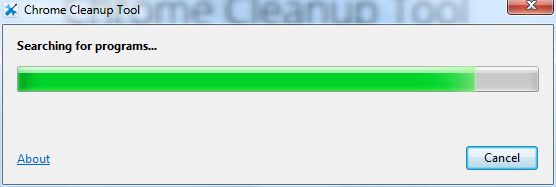
Step #06 – In case any error is found in the Google Chrome browser then the application will show you a notification and help you in removing those programs. Else, if your Google Chrome browser is working perfectly fine then it will show you “No programs found” (as shown in the screenshot below).
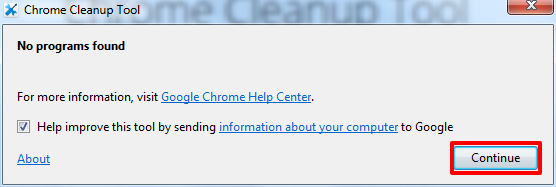
Click on the “Continue” button to proceed to the next step.
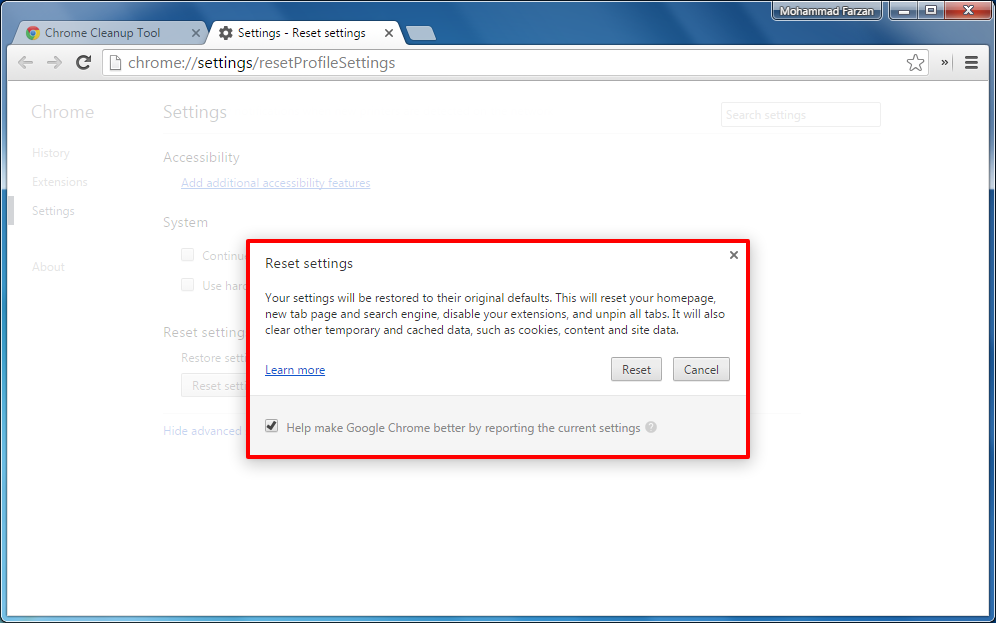
Step #07 – Now Google Chrome Cleanup Tool would trigger reset Chrome browser settings (as shown in the screenshot below). It will now show you a dialogue box and prompt you to reset all your Google Chrome settings to its default state. Click on the “Reset” button to begin the reset process.
In case you are worried about what settings would be reset, check the image attached below.
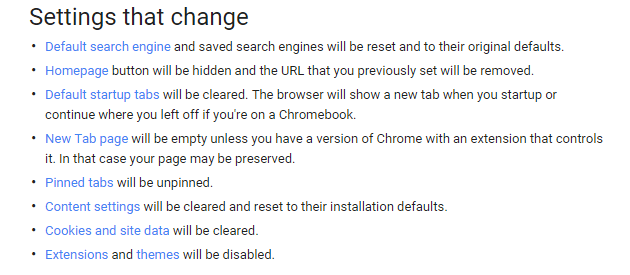
Once done, now all of your Google Chrome web browser settings should be back to its original state and the browser should be as good as it was newly installed.
Conclusion
We hope the tips and guidelines pointed out in this tutorial must have helped you to make Google Chrome fast again. If there is any question or query related to the guidelines discussed in this article, or any tip that did or did not worked out for you, then feel free to leave your comment in the comments section below and we will get back to you shortly.

